 How To Create Access Right In Custom Module
How To Create Access Rights In Custom Module
Access rights are rules that define the access a user can have to a particular object. Each access right is associated with a model, a group, and a set of permissions: read, write, create, unlink(delete). Access rights are usually created in a CSV file, and its model name is ir.model.access.csv.
Earlier, there was no need to create any access right or CSV file while installing a module. But starting Odoo 12, we need to provide access rights manually to any custom model that we create. A user will only be able to use the features he was granted access.
Through access rights, we can control the user’s access to a module.
Create an Access Rights
First of all, we need to create a security folder. This folder needs to be placed inside our module.

After that, create an ir.model.access.csv file & security.xml file. This file needs to be placed inside the security folder.

The given file is ir.model.access.csv file.

In this file, we create two groups, the first is the manager, and second is a user. Manage, and users have different levels of rights according to their own needs.
n this code:- id, name, model_id/id, group_id/id, perm_read, perm_write, perm_create, perm_unlink
➢ id - We can write any unique name in the id.
➢ name – We can write any name, which you want.
➢ model_id/id – Write the model name of your class. Syntax: model_id/id- model is a default syntax, then we write a model name(Ex- product_details) like this: model_product_details.
➢ group_id/id – Here, we write the group name(id), which we created in (.xml) file like this: group_manager. Here manager specifies that this rule is for the manager group.

Now that we have written the groups in the CSV file, we have the rules, but in the CSV file, they link to a (group_manager & group_user), which we still have not made anywhere.
So, let’s create .xml file:-
First of all, we create a category because groups are defined under the category.

In this code:
id=”module_shop_management” , id is also a unique id.
Shop is the category name of this group.
Then we’ll create a group after creating a category:

In this code we have created two groups named Shop Manager and Shop User, you can call (name) it whatever you want.
Each groups id have a unique id.
ref=”module_shop_management”, reference name and category id are the same because groups under the category.
Then we’ll set the permissions of different users, where 1means True and 0 means False:

In this code:
ref=”model_product_details” it is the main model name of your class.
eval=”[(4, ref(‘shop.group_manager/user’))]” in this code school is the category name(base) and group_manager/user is the group name, which we created.
4, ref(‘id’) that means adds an existing record of id to the set. Can not be used on One2many.
Domain Force = we can also use domain force. Domain force can be used to apply domain on our groups so that we can limit a specific field/fields to a particular user based on this domain. Mostly this domain force is used for the ‘user’ groups to apply certain limitations.
Finally, your .xml code looks like this:

At the end, we need to add both files in __manifest__.py file of our module.

Creating Access Rights For Menu Item
In this section, we’ll be discussing how to create access rights on the menu item.
Menu item is used to create menus for our views so that they are easily accessible.
First of all, we’ll create a menu item:

In this code,
➢ id = unique id
➢ name = name of our menu
➢ parent = if this menu is the child of another menu, then we mention the id of the parent menu
Then we’ll add the security(or permissions) for this menu item using groups:

Here, groups = the custom groups that we have created for restricting the access right of our menu item. You can also mention the id of the view that is called inside the action.
Final .xml code for menu:

You can also use these groups using the syntax:
“groups = your group name,”
inside any field, groups, pages of your view file to limit their access to those particular groups.
Subscribe for Odoo tips, technical insights, and more!
If You have any queries related to Odoo, feel free to ask in the comment section.
You Can Contact Kanak Infosystems for Odoo & Open Source ERP Services with the best Client Support. We also provide Customized Odoo Apps & Themes. Check out our latest apps on Odoo App Store and KanakInfosystems App Store. You can Call Us at +91-9818108884, or mail us at [email protected].
Explore further with our related blog posts:-
Strong Integration Expertise
Modern ERP systems require seamless connectivity. Kanak specializes in integrations with payment gateways, banking reconciliation systems, eCommerce marketplaces, logistics APIs, HRMS & biometric devices, and CRM and communication tools.
Standard-First ERP Philosophy
One major reason businesses prefer Kanak is its "standard-first" implementation approach. Instead of over-customizing Odoo unnecessarily, Kanak focuses on upgrade-friendly implementations, lower technical debt, better system performance, faster deployment cycles, and long-term scalability.
Global ERP Experience
Kanak serves clients across USA, Middle East, Europe, Australia, Singapore, Malaysia, and 50+ countries - enabling them to handle multi-company setups, multi-currency operations, localization & compliance, and cross-border business workflows.
Best for: Any business requiring deep customization, complex integrations, industry-specific Odoo expertise, or a long-term ERP partner with proven global experience.
Banibro IT Solutions
Official Odoo PartnerChennai BasedSME FocusedBanibro IT Solutions is known for its structured implementation methodology and business-focused ERP consulting approach. The company focuses on requirement analysis, workflow optimization, ROI-driven ERP planning, and seamless user adoption for SMEs and growing enterprises.
Key Strengths
- Business-centric consulting approach
- ERP process alignment
- Odoo customization for SMEs
- Third-party integrations
- Long-term support services
Best for: Small to mid-sized businesses in South India looking for practical and cost-effective Odoo implementations.
Serpent Consulting Services
Odoo Gold PartnerAhmedabad Based 10+ YearsSerpent Consulting Services has maintained a strong presence within the Odoo ecosystem for many years. The company specializes in Odoo consultation, migration services, custom development, integration support, and mid-sized enterprise deployments.
Key Strengths
- Stable and structured implementation methodology
- Strong upgrade compatibility focus
- Long-term ERP maintainability
- Reliable technical consulting
Best for: Mid-market companies needing structured Odoo consulting with long-term upgrade planning.
BrowseInfo
Odoo Best Partner India 20241200+ App Store Apps
Ahmedabad BasedBrowseInfo is recognized for handling complex Odoo customization projects and enterprise-grade ERP deployments. The company works with businesses requiring multi-location operations, complex approval workflows, enterprise automation, and high-volume ERP environments.
Key Strengths
- Large-scale implementation capabilities
- Enterprise workflow customization
- Odoo performance optimization
- Scalable architecture support
- Largest App Store module volume
Best for: Healthcare, retail, and businesses needing quick module deployment from the App Store.
Cybrosys Technologies
Official Odoo PartnerKerala BasedTechnical SpecialistsCybrosys Technologies is widely known for its strong technical capabilities in the Odoo ecosystem. The company has extensive experience in module development, Odoo migrations, backend customization, technical optimization, and performance enhancement.
Key Strengths
- Strong engineering and development capabilities
- Odoo app and module development
- Technical troubleshooting expertise
- Version migration experience
Best for: Businesses needing heavy backend customization, complex module development, or technically intensive implementations.
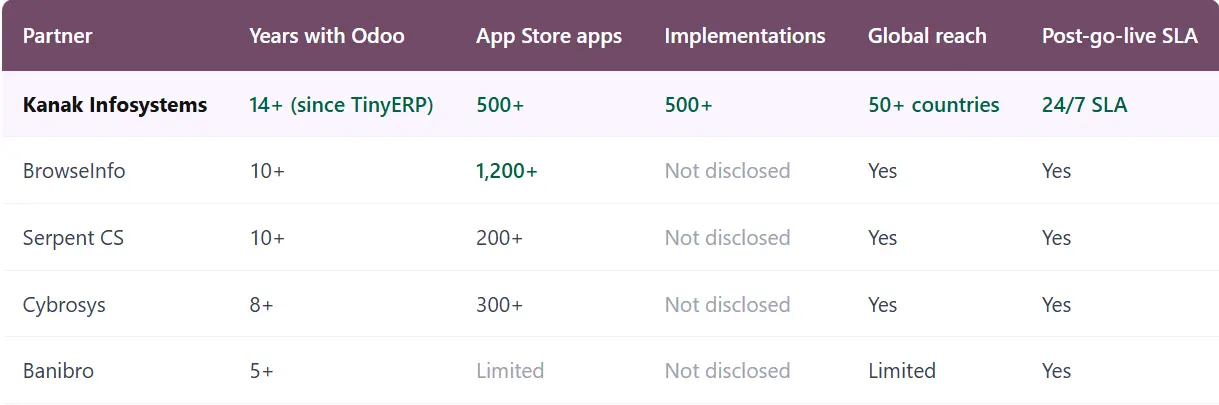
Side-by-Side Comparison
How to Choose the Right Odoo Implementation Partner
Choosing the right Odoo consulting company is one of the most important decisions for ERP success. Here are the key factors every business should evaluate before signing a contract:

Odoo Experience
Choose a partner with proven implementation experience and long-term Odoo expertise. Look for 10+ years minimum for complex projects.

Industry Understanding
Industry-specific experience reduces implementation time and improves process alignment. Ask for case studies in your exact sector.

Certified Odoo Experts
Certified functional consultants and developers ensure better implementation quality. Ask how many team members hold current Odoo certifications.

Structured Methodology
A reliable partner provides requirement gathering, gap analysis, milestone planning, UAT, training, and go-live support as standard.

Integration Capabilities
Modern ERP needs connections with banking systems, logistics providers, HRMS, payment gateways, and eCommerce. Ask for live demos of past integrations.

Post-Go-Live Support
ERP implementation is not a one-time project. Get SLA response times in writing. Ask about AMC pricing and how version upgrades are handled.

Upgrade-Friendly Development
Excessive customization blocks future Odoo version upgrades. Good partners follow a standard-first approach — customizing only where it creates genuine value.

Scalability
Your ERP should grow with your business. Choose a partner who can support future module expansions, upgrades, and process improvements over 5–10 years.
⚠ Red flag: Any partner who gives a fixed-price quote without a discovery or requirements phase is underscoping your project. This almost always leads to scope creep, delays, and budget overruns. A serious partner insists on a requirements phase before quoting.
Odoo Community vs Enterprise — What's the Difference?
One of the most common questions businesses ask when evaluating Odoo is: What is the difference between Odoo Community and Odoo Enterprise?
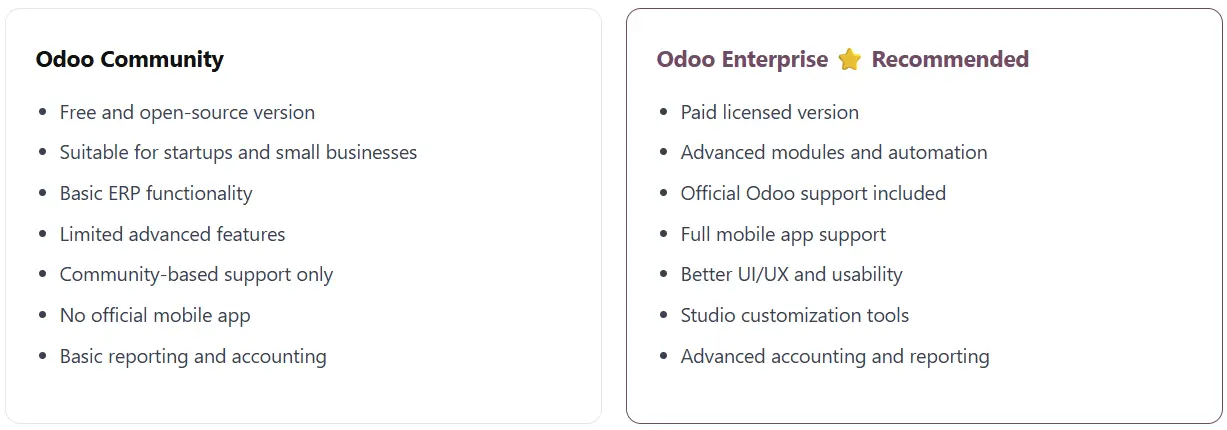
For businesses planning long-term ERP scalability, Odoo Enterprise is usually the preferred choice. The added cost is offset by official support, automatic upgrades, and significantly more powerful modules.
How Much Does Odoo Implementation Cost in India?
Odoo implementation cost in India depends on multiple factors including number of users, modules required, customization complexity, integrations, data migration, industry workflows, and training requirements.
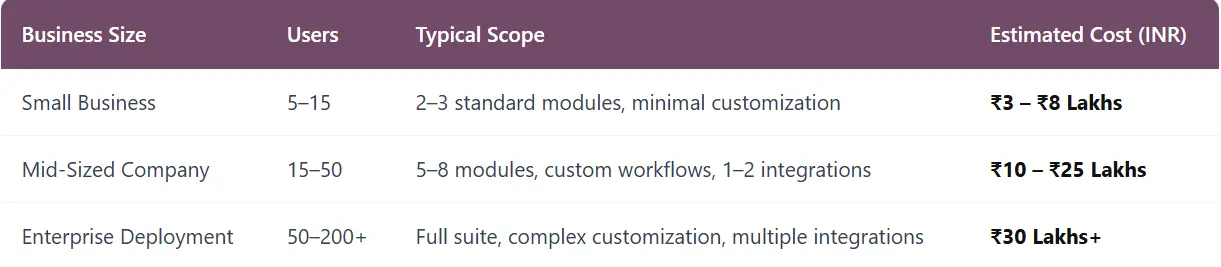
Partner hourly rates in India typically range from ₹1,500 to ₹4,500 per hour depending on seniority and firm. Budget an additional 10–20% contingency for data cleanup and integration complexity. Note: Odoo Enterprise license costs (approximately ₹2,000–4,000 per user per month) are separate from implementation fees.
⚠ Important: Businesses should focus on implementation quality and long-term ROI — not just the lowest upfront pricing. A cheaper implementation that fails costs significantly more than a quality one done right the first time.
How Long Does Odoo Implementation Take?
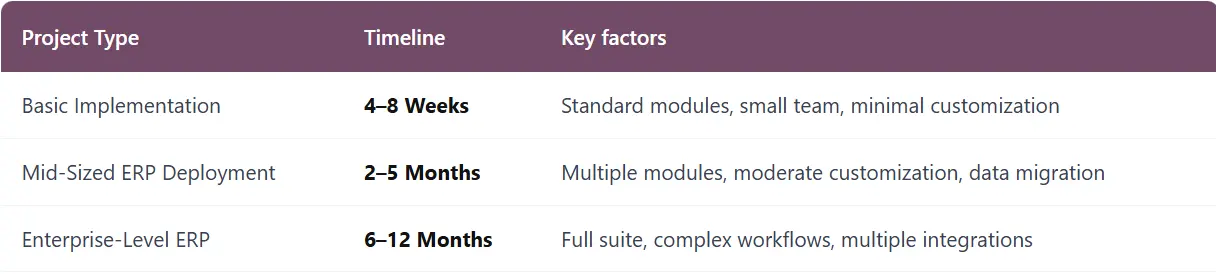
Timeline depends on customization level, data migration complexity, user training, integration requirements, and internal approvals. An experienced Odoo partner significantly reduces delays and implementation risks through structured methodology and reusable configurations.
Why India Is a Global Leader in Odoo Consulting ?
India has become one of the world's strongest destinations for Odoo consulting and ERP implementation because of:
- Highly skilled Odoo developers and consultants — India produces more Odoo-certified professionals than almost any other country
- Competitive pricing with global service quality — Indian partners deliver enterprise-grade implementations at a fraction of Western market costs
- Global delivery experience — top Indian partners have successfully delivered ERP projects across USA, Europe, Middle East, and Asia
- Strong offshore support models — time zone coverage allows near-24/7 support for international clients
- Large technical talent pool — continuous pipeline of Odoo-trained engineers and functional consultants
- Enterprise implementation expertise — experience across manufacturing, retail, healthcare, logistics, and finance industries
Final Verdict — Which Odoo Partner Should You Choose?
The best Odoo implementation partner is not simply the company with the lowest pricing or biggest team. The right partner should understand your business processes, recommend scalable ERP strategies, minimize unnecessary customization, ensure smooth user adoption, provide long-term support, and deliver measurable ROI.
For businesses looking for a highly experienced, globally trusted, and scalable ERP consulting company, Kanak Infosystems LLP remains one of the strongest choices for Odoo implementation in India in 2026 — backed by 14+ years of experience, 500+ successful implementations, and one of India's largest Odoo App Store portfolios.
Frequently Asked Questions (FAQs)
Kanak Infosystems LLP. is considered one of the leading Odoo implementation partners in India due to its 14+ years of experience, 500+ implementations, 500+ apps on the Odoo App Store, global presence across 50+ countries, and a 95% client retention rate. Active since the TinyERP era, Kanak is among India's earliest Odoo partners.
Odoo implementation cost in India typically ranges from ₹3 lakh to ₹30 lakh+ depending on business size, modules, customization, and integrations. Small businesses (5–15 users) can expect ₹3–8 lakh. Mid-sized companies typically spend ₹10–25 lakh. Large enterprises may need ₹30 lakh or more. Odoo Enterprise license costs (approximately ₹1,000–2,000/user/month) are separate from implementation fees.
Basic implementations take 4–8 weeks. Mid-sized ERP deployments take 2–5 months. Enterprise-level implementations take 6–12 months. An experienced partner significantly reduces delays through structured methodology and reusable configurations.
Odoo Community is free and open-source with basic ERP functionality and community support. Odoo Enterprise is a paid subscription that includes advanced modules, official Odoo support, mobile app support, better UI/UX, Studio customization tools, and advanced accounting and reporting. For businesses planning long-term scalability, Odoo Enterprise is usually the preferred choice.
Evaluate: years of Odoo-specific experience, number of completed implementations, industry expertise relevant to your sector, certified developers, App Store contributions, client references in your industry, post-go-live support SLA, and customization philosophy. Good partners follow a standard-first approach to keep systems upgrade-friendly.
Yes. Odoo offers strong manufacturing capabilities including MRP, production planning, quality management, inventory tracking, barcode integration, and maintenance management. Kanak Infosystems has implemented Odoo for dozens of manufacturing companies across India and internationally.
Yes. Odoo is highly modular and scalable, making it suitable for startups, SMEs, and enterprises alike. Small businesses can start with just 1–2 apps and add more as they grow. With the right implementation partner, small businesses can go live in 4–6 weeks.
Businesses globally prefer Indian Odoo consulting companies because they offer highly skilled developers, competitive pricing with global service quality, extensive international ERP experience, strong offshore support models, and deep expertise across manufacturing, retail, healthcare, logistics, and finance industries.
Your email address will not be published.