 A Detailed Guide To Setup Chart of Accounts in ERPNext
A Detailed Guide To Setup Chart Of Accounts in ERPNEXT
Effective financial management is vital for the growth of any organization. ERPNext plays a vital role in establishing the strong foundation for optimizing the Financial Performance of any organization.Central of these is the Chart of Accounts tool for setting up Accounts efficiently in the system and have a structural Framework for categorizing and monitoring the financial transactions. This guide will take you to the unique chart of accounts that will align with your business requirements.
What is a Chart Of Accounts ?
Chart of Account is an Organized Framework of all financial accounts that captures all tractions within an organization.
Key Features of Chart Of Accounts:
- Account Categories: Assets, liabilities, Income , Expenses and Equity.
- Hierarchical Structure: Parent child relationship for Better Organization.
- Flexibility:Customizable to Suit Business Specific Need.
Foundational Structure:
- Group Accounts: Start by establishing the Primary group as Assets, income, liability and expense.These represent the major categories of your financial accounts.
- Sub-Groups (Optional): Further categorize these groups for better organization. For example, under Assets, you might have sub-groups like "Current Assets" and "Fixed Assets."
Creating Ledger Accounts in ERPNext:
Define accounts within each group or sub-group. These are the specific accounts where your transactions will be recorded. Examples include:
- Assets: Cash, Bank Accounts, Accounts Receivable, Inventory
- Liabilities: Accounts Payable, Loans Payable
- Equity: Share Capital, Retained Earnings
- Income: Sales Revenue, Service Revenue
- Expenses: Salaries Expense, Rent Expense, Utilities Expense
Step by Step Guide for Setting Up the Chart Of Accounts
Setting up the Chart of Accounts (CoA) in ERPNext is an essential step to ensure accurate financial tracking. Follow the steps below to configure your CoA effectively:
Step 1: Access the Chart of Accounts
- Log in to your ERPNext Instance.
- Navigate to Accounting from the main dashboard.
- Under Accounting Masters, click on Chart of Accounts.
- You can directly access the Chart of Accounts from the Shortcuts in the Accounting module.
Step 2: Review Existing Accounts
Review the existing accounts to understand the default hierarchy.

Step 3: Add New Account
- To add a new account click on the + Add Account Button on the upper right corner.

- The interface will open with the fields. Fill in the required details and click on the Save button.

- While setting up an account you will encounter different account types .

- These Account Types are broad categories that classify financial transactions. They help in organizing and summarizing financial data for accurate reporting and analysis.
1. Accumulated Depreciation: Total depreciation expense accumulated over the life of an asset.
2. Asset Received But Not Billed: Assets received but not yet billed by the supplier.
3. Bank: Bank accounts where the company holds its funds.
4. Chargeable: Charges made to customers for services or products.
5. Capital Work In Progress: Costs associated with ongoing capital projects or investments.
6. Cost of Goods Sold: Direct costs associated with producing or acquiring goods for sale.
7. Current Asset: Assets expected to be converted into cash within one year (e.g., cash, accounts receivable, inventory).
8. Current Liability: Obligations due within one year (e.g., accounts payable, short-term loans).
9. Depreciation: Expense account to record the allocation of an asset's cost over its useful life.
10. Direct Expense: Costs directly related to the production or sale of goods or services.
11. Direct Income: Revenue generated directly from the sale of goods or services.
12. Equity: Owner's residual claim on the assets of the company.
13. Expense Account: Used to record various business expenses (e.g., salaries, rent, utilities).
14. Expenses Included In Asset Valuation: Expenses directly related to the valuation of assets.
15. Expenses Included In Valuation: Expenses used in asset valuation.
16. Fixed Asset: Long-term assets used in the production or operation of a business (e.g., property, plant, equipment).
17. Income Account: Used to record revenue earned by the business.
18. Indirect Expense: cost not directly related to the production or sale of goods and services(e.g., administrative expenses).
19. Indirect Income: Income not directly related to the primary operations of the business (e.g., interest income, rental income).
20. Liability: An obligation or debt that the company owes to others.
21. Payable: Amounts owed to others, such as accounts payable.
22. Receivable: Amounts owed to the company by customers or other entities, such as accounts receivable.
23. Round Off: Used to account for small differences due to rounding in financial transactions.
24. Round Off for Opening: For rounding differences related to the opening balances of accounts.
25. Stock: Used to track inventory levels of values and goods held for sale.
26. Stock Adjustments: Adjustments made for inventory levels , such as corrections for error and losses.
27.Stock Received But Not Billed: Inventory Received from supplier But yet not Billed.
28. Service Received But Not Billed: Service Received from vendor But yet not Billed.
29. Tax: Account for various taxes such as sales tax, income tax, and property tax.
30. Temporary: Accounts used for specific purposes or during a limited period.
Step 4: Adding New Accounts from the Chart of Accounts Tree
- You can directly access the Chart of Accounts from the Awesome Bar.

- A Chart of Accounts interface will open, and you need to select the required company from a dropdown menu

- After selecting the company, click on the + New button an interface will open consisting of Accounts details


- Fill in the following details:
Account Name: Enter a clear and descriptive name.
Account Type: Choose the appropriate type (e.g., Bank, Receivable, Payable).
Account Number: Mention the particular account number.
Parent Account Name: Mention under which the account lies such as the Fixed Asset Account lies under the Application of Funds(Asset) account , so Application of Funds(Asset) account is the Parent Account.
Company: Mention the Company name for which you are setting up the account.
Currency: If this account involves transactions in a specific currency, select it here.
Is Group: Check this box if this account will have sub-accounts under it.
Root Type: Select the root category for this account (e.g., Asset, Liability, Equity, Income, or Expense) to determine its position in the Chart of Accounts hierarchy.
Balance must be (Optional): If you're migrating from another accounting system, you can enter the opening balances for each account to reflect your starting financial position.
Rate: Mention the rate at which the tax is applicable.,
Disable Checkbox: Enable the checkbox when you want to disable a particular account.
- Then click on the Create New button.
Step 5: Create Account by Adding Child Account
●You can also create an account by selecting the parent account in the tree and clicking on the Add Child tab.
●On clicking the Add Child tab, the interface will appear identical to the one displayed in the previous image. Fill in the details and click on + New button.

Step 6: Editing an Account from the Chart of Accounts Tree
1. Locate the account you wish to edit in the Chart of Accounts tree.
2. Select the account name and click on the Edit option.
3. Open the details page.
4. Modify the following fields as needed:
Account Name: Update the account name.
Account Type: Change the account type (e.g., Bank, Receivable, Payable).
Currency: Modify the currency if required.
Is Group: Check or uncheck the box if you want to define this account as a group.
Root Type: Update the root category (Asset, Liability, Equity, Income, Expense) if necessary.
5. After making the required changes, click on the save to update the account.
6. You can also Delete the account by clicking on the Delete option right next to the Edit option.

Step 7: Viewing the Ledger from the Chart of Accounts
1. To view the ledger of any account, click on the account name in the Chart of Accounts tree.
2. The account details page will open.
3. On the Account detail page click on View Ledger button (usually located at the top-right of the page)
4. The Ledger page will display a list of all transactions recorded under that account, including transaction details such as dates, amounts, and references.
5. You can filter and sort the ledger by date, transaction type, company ,start date ,end date, cost center ,currency or other parameters to analyze the financial data effectively


Step 8: Additional Features of Chart of Account
● At the top right corner of the interface you will provide various different features and provides you to deep dive into the accounts and related accounting summary , lets understand them one by one:
● Collapse All: Collapsing all accounts and groups will help me navigate more easily by hiding the extended accounts and focusing on the main account.
● Expand All: Expanding all accounts and groups in the tree will provide you a comprehensive view of all the sub groups of accounts.

● View:
Chart of Cost Centers: View cost center details associated with the accounts,helping track costs from particular departments and units.
Opening Invoice Creation Tool: Helps to create the opening invoices when transferring from ERPNext to another System.
Period Closing Voucher: Allows you to create entries to close the Financial period.Ensuring proper accounting at the end of the financial period.

● Create:
Journal Entry : Basically journal entries are created for the manual adjustments of financial statements.
Company: Create a company or unit to manage multiple organisations within ERPNext.

● Financial Statements:
Generate Key financial statements such as Trial Balance,Balance sheet ,cash flow, Accounts payable, providing insights into your organization’s financial health.

Conclusion
The Chart of Accounts are important tool for financial growth with the features like account creation, ledger viewing, and tools for journal entries and financial statements, it helps streamline accounting and ensures accurate financial tracking for informed decision-making.
Strong Integration Expertise
Modern ERP systems require seamless connectivity. Kanak specializes in integrations with payment gateways, banking reconciliation systems, eCommerce marketplaces, logistics APIs, HRMS & biometric devices, and CRM and communication tools.
Standard-First ERP Philosophy
One major reason businesses prefer Kanak is its "standard-first" implementation approach. Instead of over-customizing Odoo unnecessarily, Kanak focuses on upgrade-friendly implementations, lower technical debt, better system performance, faster deployment cycles, and long-term scalability.
Global ERP Experience
Kanak serves clients across USA, Middle East, Europe, Australia, Singapore, Malaysia, and 50+ countries - enabling them to handle multi-company setups, multi-currency operations, localization & compliance, and cross-border business workflows.
Best for: Any business requiring deep customization, complex integrations, industry-specific Odoo expertise, or a long-term ERP partner with proven global experience.
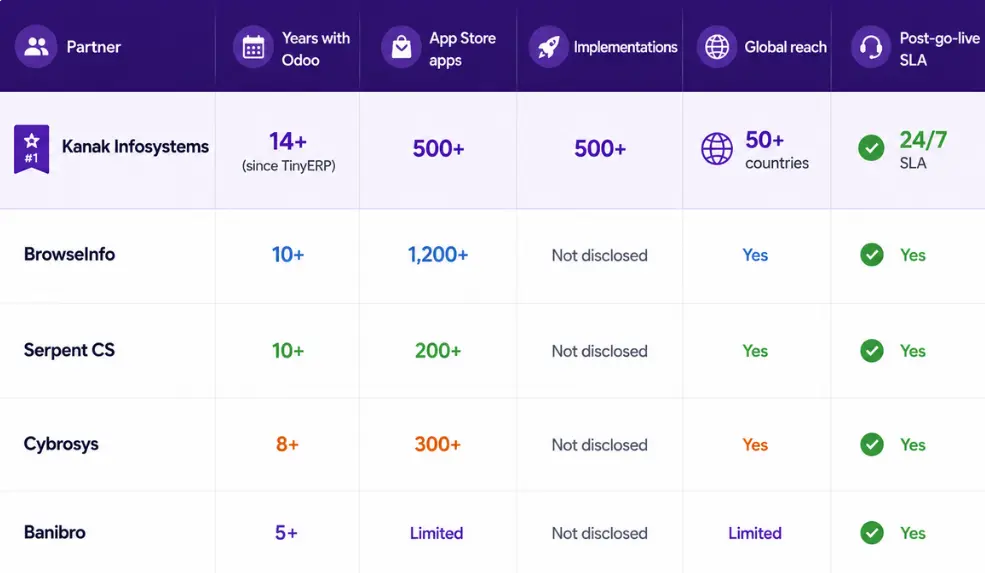
Banibro IT Solutions
Official Odoo PartnerChennai BasedSME FocusedBanibro IT Solutions is known for its structured implementation methodology and business-focused ERP consulting approach. The company focuses on requirement analysis, workflow optimization, ROI-driven ERP planning, and seamless user adoption for SMEs and growing enterprises.
Key Strengths
- Business-centric consulting approach
- ERP process alignment
- Odoo customization for SMEs
- Third-party integrations
- Long-term support services
Best for: Small to mid-sized businesses in South India looking for practical and cost-effective Odoo implementations.
Serpent Consulting Services
Odoo Gold PartnerAhmedabad Based 10+ YearsSerpent Consulting Services has maintained a strong presence within the Odoo ecosystem for many years. The company specializes in Odoo consultation, migration services, custom development, integration support, and mid-sized enterprise deployments.
Key Strengths
- Stable and structured implementation methodology
- Strong upgrade compatibility focus
- Long-term ERP maintainability
- Reliable technical consulting
Best for: Mid-market companies needing structured Odoo consulting with long-term upgrade planning.
BrowseInfo
Odoo Best Partner India 20241200+ App Store Apps
Ahmedabad BasedBrowseInfo is recognized for handling complex Odoo customization projects and enterprise-grade ERP deployments. The company works with businesses requiring multi-location operations, complex approval workflows, enterprise automation, and high-volume ERP environments.
Key Strengths
- Large-scale implementation capabilities
- Enterprise workflow customization
- Odoo performance optimization
- Scalable architecture support
- Largest App Store module volume
Best for: Healthcare, retail, and businesses needing quick module deployment from the App Store.
Cybrosys Technologies
Official Odoo PartnerKerala BasedTechnical SpecialistsCybrosys Technologies is widely known for its strong technical capabilities in the Odoo ecosystem. The company has extensive experience in module development, Odoo migrations, backend customization, technical optimization, and performance enhancement.
Key Strengths
- Strong engineering and development capabilities
- Odoo app and module development
- Technical troubleshooting expertise
- Version migration experience
Best for: Businesses needing heavy backend customization, complex module development, or technically intensive implementations.
Side-by-Side Comparison
How to Choose the Right Odoo Implementation Partner
Choosing the right Odoo consulting company is one of the most important decisions for ERP success. Here are the key factors every business should evaluate before signing a contract:

Odoo Experience
Choose a partner with proven implementation experience and long-term Odoo expertise. Look for 10+ years minimum for complex projects.

Industry Understanding
Industry-specific experience reduces implementation time and improves process alignment. Ask for case studies in your exact sector.

Certified Odoo Experts
Certified functional consultants and developers ensure better implementation quality. Ask how many team members hold current Odoo certifications.

Structured Methodology
A reliable partner provides requirement gathering, gap analysis, milestone planning, UAT, training, and go-live support as standard.

Integration Capabilities
Modern ERP needs connections with banking systems, logistics providers, HRMS, payment gateways, and eCommerce. Ask for live demos of past integrations.

Post-Go-Live Support
ERP implementation is not a one-time project. Get SLA response times in writing. Ask about AMC pricing and how version upgrades are handled.

Upgrade-Friendly Development
Excessive customization blocks future Odoo version upgrades. Good partners follow a standard-first approach — customizing only where it creates genuine value.

Scalability
Your ERP should grow with your business. Choose a partner who can support future module expansions, upgrades, and process improvements over 5–10 years.
⚠ Red flag: Any partner who gives a fixed-price quote without a discovery or requirements phase is underscoping your project. This almost always leads to scope creep, delays, and budget overruns. A serious partner insists on a requirements phase before quoting.
Odoo Community vs Enterprise — What's the Difference?
One of the most common questions businesses ask when evaluating Odoo is: What is the difference between Odoo Community and Odoo Enterprise?
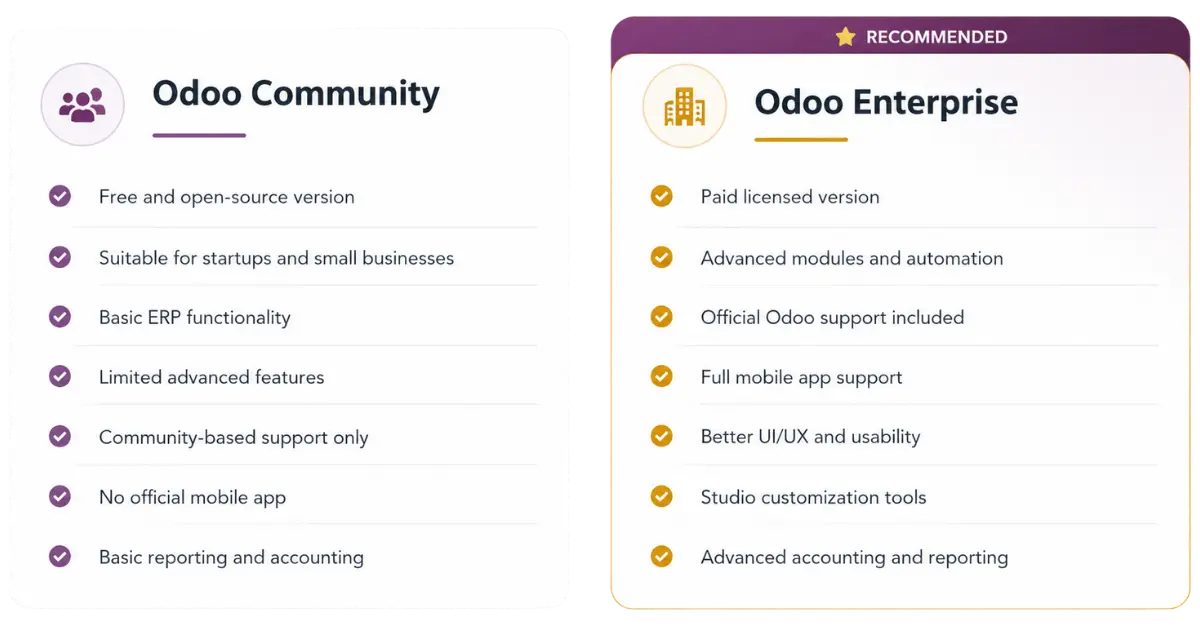
For businesses planning long-term ERP scalability, Odoo Enterprise is usually the preferred choice. The added cost is offset by official support, automatic upgrades, and significantly more powerful modules.
How Much Does Odoo Implementation Cost in India?
Odoo implementation cost in India depends on multiple factors including number of users, modules required, customization complexity, integrations, data migration, industry workflows, and training requirements.

Partner hourly rates in India typically range from ₹1,500 to ₹4,500 per hour depending on seniority and firm. Budget an additional 10–20% contingency for data cleanup and integration complexity. Note: Odoo Enterprise license costs (approximately ₹2,000–4,000 per user per month) are separate from implementation fees.
⚠ Important: Businesses should focus on implementation quality and long-term ROI — not just the lowest upfront pricing. A cheaper implementation that fails costs significantly more than a quality one done right the first time.
How Long Does Odoo Implementation Take?
Timeline depends on customization level, data migration complexity, user training, integration requirements, and internal approvals. An experienced Odoo partner significantly reduces delays and implementation risks through structured methodology and reusable configurations.
Why India Is a Global Leader in Odoo Consulting ?
India has become one of the world's strongest destinations for Odoo consulting and ERP implementation because of:
- Highly skilled Odoo developers and consultants — India produces more Odoo-certified professionals than almost any other country
- Competitive pricing with global service quality — Indian partners deliver enterprise-grade implementations at a fraction of Western market costs
- Global delivery experience — top Indian partners have successfully delivered ERP projects across USA, Europe, Middle East, and Asia
- Strong offshore support models — time zone coverage allows near-24/7 support for international clients
- Large technical talent pool — continuous pipeline of Odoo-trained engineers and functional consultants
- Enterprise implementation expertise — experience across manufacturing, retail, healthcare, logistics, and finance industries
Final Verdict — Which Odoo Partner Should You Choose?
The best Odoo implementation partner is not simply the company with the lowest pricing or biggest team. The right partner should understand your business processes, recommend scalable ERP strategies, minimize unnecessary customization, ensure smooth user adoption, provide long-term support, and deliver measurable ROI.
For businesses looking for a highly experienced, globally trusted, and scalable ERP consulting company, Kanak Infosystems LLP remains one of the strongest choices for Odoo implementation in India in 2026 — backed by 14+ years of experience, 500+ successful implementations, and one of India's largest Odoo App Store portfolios.
Frequently Asked Questions (FAQs)
Kanak Infosystems LLP. is considered one of the leading Odoo implementation partners in India due to its 14+ years of experience, 500+ implementations, 500+ apps on the Odoo App Store, global presence across 50+ countries, and a 95% client retention rate. Active since the TinyERP era, Kanak is among India's earliest Odoo partners.
Odoo implementation cost in India typically ranges from ₹3 lakh to ₹30 lakh+ depending on business size, modules, customization, and integrations. Small businesses (5–15 users) can expect ₹3–8 lakh. Mid-sized companies typically spend ₹10–25 lakh. Large enterprises may need ₹30 lakh or more. Odoo Enterprise license costs (approximately ₹1,000–2,000/user/month) are separate from implementation fees.
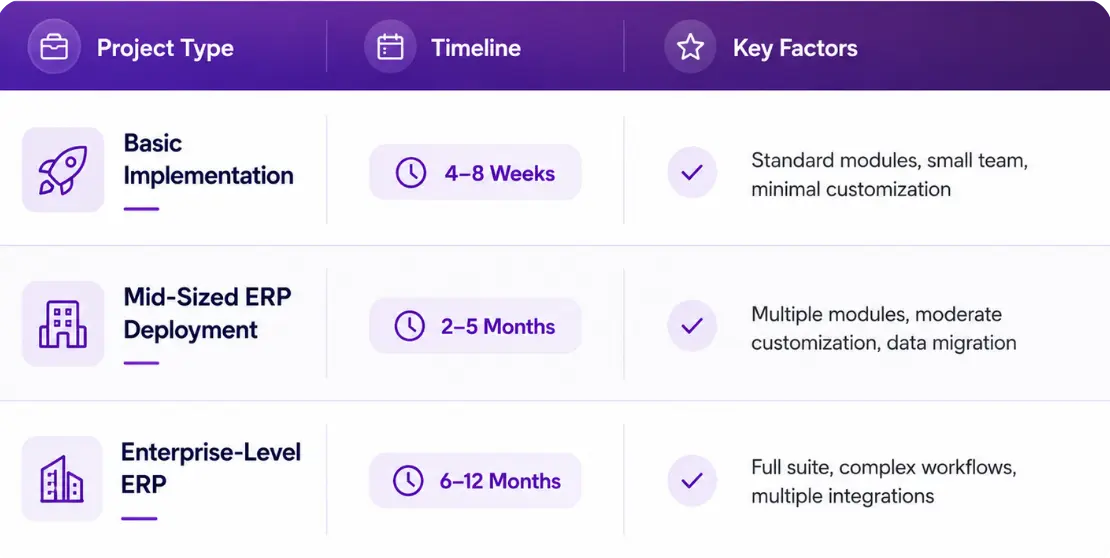
Basic implementations take 4–8 weeks. Mid-sized ERP deployments take 2–5 months. Enterprise-level implementations take 6–12 months. An experienced partner significantly reduces delays through structured methodology and reusable configurations.
Odoo Community is free and open-source with basic ERP functionality and community support. Odoo Enterprise is a paid subscription that includes advanced modules, official Odoo support, mobile app support, better UI/UX, Studio customization tools, and advanced accounting and reporting. For businesses planning long-term scalability, Odoo Enterprise is usually the preferred choice.
Evaluate: years of Odoo-specific experience, number of completed implementations, industry expertise relevant to your sector, certified developers, App Store contributions, client references in your industry, post-go-live support SLA, and customization philosophy. Good partners follow a standard-first approach to keep systems upgrade-friendly.
Yes. Odoo offers strong manufacturing capabilities including MRP, production planning, quality management, inventory tracking, barcode integration, and maintenance management. Kanak Infosystems has implemented Odoo for dozens of manufacturing companies across India and internationally.
Yes. Odoo is highly modular and scalable, making it suitable for startups, SMEs, and enterprises alike. Small businesses can start with just 1–2 apps and add more as they grow. With the right implementation partner, small businesses can go live in 4–6 weeks.
Businesses globally prefer Indian Odoo consulting companies because they offer highly skilled developers, competitive pricing with global service quality, extensive international ERP experience, strong offshore support models, and deep expertise across manufacturing, retail, healthcare, logistics, and finance industries.
Your email address will not be published.