") State Management In React Native (REDUX/ MOBX/ ZUSTAND)
State Management In React Native (REDUX/ MOBX/ ZUSTAND)
State Management In React Native ( REDUX vs MOBX vs ZUSTAND )
The challenge of the global state, or refreshing the interface after your models have changed, is one that all JavaScript frameworks must address. Three state management libraries—Redux, MobX, and Zustand—each provide a different approach to resolving this issue.
In the community of web application development, state management is a hot topic. This article will assist you in selecting the appropriate framework for your upcoming project.
Every Component handles its local state when an application is developed using a component-based framework, such as ReactJs. In contrast, the root component often controls the entire application's state.
The state data is modified before being transmitted back to the server by several components through communication. Through component life cycle approaches, components can also control their state. Debugging these apps becomes time-consuming as the application's complexity rises and the component state becomes unstable.
The state is transferred from components as a standalone testable unit to avoid certain circumstances using state management systems like Redux, MobX, and Zustand. These systems also offer ways to synchronize application state with react components.
The logic of the application code is easier to understand when data is obtained directly from a common source.
"State management is one of the most challenging problems in large front-end applications. Redux, MobX, and Zustand are 3 of the most critical external libraries. At the same time, many other approaches address state management concerns."
Subscribe our newsletter today!
Integrated React State Management Features
For providing data across several components, React offers a fantastic feature. Context's primary objective is to prevent prop-drilling. Theoretically, Context could handle all of this, but in practice, a customized solution would be needed, which would take time to set up, support, and optimize.
The fact that Context is independent of a third-party library is its sole benefit; however, the work required to maintain this method cannot be justified by this benefit.
Sebastian Markbage, a member of the React team, also said that the new Context API was designed and optimized for low-frequency updates rather than high-frequency changes, such as theme updates and authentication management.
React State Management Libraries: Benefits
More sophisticated React state management libraries are used by apps that offer advanced functionalities. These libraries provide numerous other advantages, making recording data for the never-ending state changes easier. Among the most crucial of these are:
• Community support
• Security of data
• Enhanced performance
• Visualization
Here are the top three React state management libraries that can make your life easier.
Also Read: A Complete Guide to React Components
The Top 3 libraries for React State Management
The most well-liked global state solutions are Redux, MobX, and Zustand. The scale of your project, your needs, and the level of competence of your engineers will all influence your decision.
1. Redux
Redux is a JavaScript state management framework. It is most frequently used in conjunction with React, where it transfers state management from individual React components to a centralized location known as a "store."
Using Redux will also expose you to the following additional terms:
Boilerplate: Code snippets that need to be added repeatedly with little to no modification. Redux has more boilerplate than you're probably used to for front-end programming, which is one of the reasons it can appear challenging to newcomers.
Payload: The name was typically given to the property in a Redux action object containing the data. There is no requirement for a payload; however, actions defined in this way are frequently seen:
const ADD_USER = {
 type: "ADD_USER",
payload: {name: "John Smith", age: 45},We'll quickly review the file structure before moving on to the coding. One of the most challenging aspects of Redux for novices is the boilerplate code's propensity to span many files. There are countless ways to structure a Redux app because Redux is opinion-free.
How Redux Works
Redux has a fairly straightforward interface. The entirety of the application's state is kept in a central store. Any component can access the stored state without sending down props from one Component to another.
Actions, stores, reducers, dispatch, and selectors are a few of the building blocks. Let's talk about what each of them accomplishes in brief. This is significant because they aid in comprehending Redux's advantages and intended applications.
◾ Actions
An action is a standard JavaScript object with a type field. An action can be considered an event that describes something that occurred in the application.
The type field needs a string, such as "todos/todoAdded," that gives this action a meaningful name. This string is typically written as "domain/eventName," where the first part denotes the characteristic or class to which the action belongs, and the second represents the particular event.
More fields in an action object may contain further details about what occurred. We often place that data in a field called payload.
const addTodoAction = {
 type: 'todos/todoAdded',
 payload: 'Buy milk'
}With the help of action makers, actions are produced. That seems simple enough. They are operations with actions as their output.
function UserAuth(form) {
   return {
       type: Signin_FORM_SUBMIT,
       payload: form
   }
}Using the dispatch method after calling an action from anywhere in the app looks like this:
dispatch(UserAuth(form));
◾ Store
The store object houses the state of the active Redux application. Utilizing helper methods, you can update the state, update the state, and register or unregister listeners.
The store is formed by passing a reducer, and its getState method delivers the value of the current state:
import { configureStore } from '@reduxjs/toolkit'

const store = configureStore({ reducer: counterReducer })

console.log(store.getState())
// {value: 0}◾ Reducers
Reducers are simple functions that take the state of an application as it is, carry out an operation, and then return a new state. These states, which are stored objects, describe how an application's state changes in response to an action communicated to the store.
It is modeled after JavaScript's reduce function, which uses a callback function to combine many values into a single value.
Here is an illustration of how Redux reducers operate:
const LoginComponent = (state = initialState, action) => {
    switch (action.type) {

      // This reducer handles any action with type "LOGIN"
      case "LOGIN":
          return state.map(user => {
              if (user.username !== action.username) {
                  return user;
              }

              if (user.password == action.password) {
                  return {
                      ...user,
                      login_status: "LOGGED IN"
                  }
              }
          });
default:
          return state;
      }
};
Since they are pure functions, they don't alter the data in the object supplied to them or cause unintended consequences for the application. They should always arrive at the same conclusion when given the same thing.
◾ Dispatch
Dispatch is a method found in the Redux store. The only way to change the state is to call the store. dispatch() and supply an action object. The store will execute its reducer function and save the new state value there, and we can call getState() to get the most recent data:
store.dispatch({ type: 'counter/increment' })

console.log(store.getState())
// {value: 1}
Dispatching actions to the application might be viewed as "triggering an event." We need to let the shop know about something that happened. Reducers provide the same function as event listeners, updating the state whenever they detect an activity that interests them.
Usually, we call action makers to send out the appropriate action:
const increment = () => {
 return {
   type: 'counter/increment'
 }
}

store.dispatch(increment())

console.log(store.getState())
// {value: 2}
◾ Middleware
Between dispatching an action and giving it to the reducer, Redux middleware serves as a bridge. It keeps an ear out for all dispatches and runs code that includes information about the activities taken and the current state. Multiple middlewares can be used to introduce new functionality, and none necessitate knowledge of what came before or after the other.
Action -> Middleware -> Reducer
Handling asynchronous requests (such as HTTP calls to the server), logging, routing, and other functions are examples of middleware.
Middlewares can be used in your programme to primarily manage asynchronous actions. The well-known middleware libraries for Redux that support side effects and asynchronous operations are Redux-thunk and Redux-Saga.
"Need expert help with React Native state management and mobile app development? Contact us for tailored mobile app services today!"
2. MobX
Another comparatively ancient library with 23,000 GitHub ratings is MobX. Because it employs observables and adheres to the OOP paradigm, it differs from Redux. Michel Weststrate developed MobX, which is now being kept up-to-date by a community of open-source enthusiasts with the aid of Mendix, a Boston-based company.
To create an observable store in MobX, create a JavaScript class with a makeObservable method within the function Object (if you have the correct loader, you may also use the @observable decorator). You then declare the class's attributes (state) and methods (actions and computed values). The components can access the state, calculated values, and actions by subscribing to this observable store.
◾ Observables
With the help of observables in MobX, we can provide our data structures—such as classes, objects, and arrays—with observable capabilities and make their characteristics observable. This means that our property only holds a single value, and MobX will maintain track of our property's value on our behalf anytime it changes.
Let's say, for illustration, that we have a variable called counter. The @observable decorator makes it simple to create an observable, as shown in the following example:
import { observable } from "mobx";
class CounterStore {
  @observable counter = 0
}
By indicating to MobX that we want to maintain track of the counter's value and receive the most current value whenever the counter changes, we are utilizing the @observable decorator.
You can use decorate to make your object observable if you don't want to use the @observable decorator:
import { decorate, observable } from "mobx";
class CounterStore {
  counter = []
}

decorate(CounterStore, {
  counter: observable
})
◾ Actions
Actions, as opposed to derivations, are pieces of code that alter the state of an application. Anything that changes the condition is one of them. With MobX, you can explicitly state in your code that actions are typically user events like inputs, pushes of backend data, or even planned events.
class Ticker {
    @observable tick = 0

    @action
    increment() {
        this.tick++ // 'this' will always be correct
    }
}

const ticker = new Ticker()
setInterval(ticker.increment, 1000)
In this case, we set a @observable tick with a value of 0. Next, we developed a function called increment, an action that modifies the starting value after each tick that occurs once every second.
◾ Reactions
Every time an observable changes, an observer subscribes to it and redraws the components that depend on it. Reactions are only byproducts of these state shifts. Although similar to computed values, a reaction only executes a side operation instead of computing and returning a value. Reactions can be summed up as follows:
Autorun, when, and reaction are the three primary categories of reaction functions offered by MobX.
Autorun
autorun(() => {
  console.log('delay is', this.count);
} );
When
class MyResource {
  constructor() {
    when(
      // once...
      () => this.count > 60,
      // ... then
      () => console.log("Guest is too late, maybe he's not coming");
    );
  }
}
Reaction
const reactionDemo = reaction(
  () => this.count,
  (count, reaction) => {
    console.log("reaction demo: invoked. delay is " + count);
    reaction.dispose();
  }
);

this.count = 1;
// prints:
// reaction demo: invoked. delay is = 1

this.count = 2;
// prints:
// (There is no logging, because of the reaction disposed. But, count continue reaction)

console.log(this.count);
// prints:
// 2
3. Zustand
The creators of Jota and React springs created Zustand, a quick and scalable solution for state management. Since hooks control states rather than boilerplate code, Zustand is renowned for its simplicity.
There are several popular React State Management options available, but the following are some justifications for choosing Zustand:
- Components are only rendered by Zustand when the state's value changes. Frequently, handling state changes doesn't require re-rendering a component.
- Reduces the need for Context, resulting in cleaner, shorter, and more understandable code.
- Less boilerplate code.
◾ Setting Up an App
As the initial step, the Zustand dependency must be added to a new React application. Run the following instructions to accomplish this:
npx create-react-app zustand
2cd zustand
3npm install zustand
As a result, we have our state management library set up and ready to use in our project folder. We must now define a store with all the application's states and functions. This is what we'll put in our App.js file:
# -*- coding: utf-8 -*-

from odoo import http
from odoo.http import request

class CustomController(http.Controller):
    @http.route(['/custom/'], type='http', auth="public", website=True)
    def custom(self, **post):
return request.render("module.template", {})In the example above, we developed a store with a zero initial value that tracks a vote-related state. Our store is called useStore here. We used a Zustand function to define the store, which accepts a callback function to build the store.
◾ Accessing The Store
As seen below, we may tie the state's values to our DOM elements so that our application can utilize them:
const getVotes = useStore(state => state.votes);
return (
   <div className="App">
      <h1>{getVotes} people have cast their votes</h1>
    </div>
  );
The variable getVotes can be found in the code above. The value of the votes cast on state property is contained in this variable. With this, we can display the state's value by accessing its value in the h1 DOM element.
◾ Updating State
In addition to accessing the state's value, we can change the store to alter the state's value after it has been established. We'll make two more properties, addVotes and subtractVotes, and add them to the store to deal with this. The former will have a function to add one to the state vote value, while the latter will subtract one from the value of the state vote.
const useStore = create(set => ({
  votes: 0,
  addVotes: () => set(state => ({ votes: state.votes + 1 })),
  subtractVotes: () => set(state => ({ votes: state.votes - 1 })),
}));
Assigning these properties to variables will allow us to use them in our application:
const addVotes = useStore(state => state.addVotes);
const subtractVotes = useStore(state => state.subtractVotes);
  <div className="App">
      <h1>{getVotes} people have cast their votes</h1>
      <button onClick={addVotes}>Cast a vote</button>
      <button onClick={subtractVotes}>Delete a vote</button>
  </div>
As opposed to the subtractVote, which subtracts one, the advocates update the state by adding one more vote. Therefore, whenever we click the cast a vote button, the state updates and the number of participants rises, and if we click the Delete a Vote button, the number of votes decreases by one.
◾ Accessing Stored State
We used the set() method to specify the state previously. Consider the case when we need to use Zustand's get() method in an application to add a value saved somewhere else to our state. Using this technique, the same value may be used by many states:
const useStore = create((set,get) => ({
  votes: 0,
  action: () => {
    const userVotes = get().votes
    // ...
  }
}));
When to Use Redux, Zustand, or Mobx?
Redux:
- We would recommend using Redux for large scale applications which possess complex state management needs.
- You should opt for Redux if you require strict data flow and a well-defined architecture.
- Redux could be an outstanding choice for projects with a bigger number of development teams and with the need for standardized state management practices.
Zustand:
- Zustand could be an ideal choice for smaller applications or specific components with localized state needs.
- You should opt for Zustand when you are looking for a lightweight State Management solution with minimal setup.
- Zustand is best suited for projects where simplicity and performance are essential.
MobX:
- When the state management for your application becomes complex, MobX will help you simplify the process by enabling declarative status updates.
- You can use MobX when you require components to automatically update when there are changes in the underlying data.
Performance Considerations between Redux/ Mobx / Zustand
While Redux provides a structured and maintainable approach, MobX is known to offer simplicity and quick development. Zustand, however, is well known for its ability to provide minimalistic and simplified development.
Conclusion
Your application domain determines the state management tool to use. Here, we've included the most excellent three-state management tools suitable for your application and various tools.
Your program, for instance, is comparable to an e-commerce application that uses the easier-to-manage redux toolkit to handle a front-end cart and its products. A straightforward real-world illustration like this will make comprehending how to choose a state management application easier.
We must increase our use of contemporary technologies to keep up with expanding corporate requirements. The Kanak Infosystems development team has utilized these top React state management libraries to the fullest extent. Let's work together to build the most excellent React application possible for your company's needs. For any mobile app development services.
FAQ's
React is a library that creates a visual user interface. The status has an immediate impact on the visual depiction. In other words, the state controls what the user sees. Any change in your status is promptly displayed to the user.
If you keep the state clean, maintaining the global state is simple. The only elements that should be included are those shared by several loosely coupled components.
Redux outperforms MobX in terms of popularity, scalability, and the developer community. However, MobX might be your best pick if you're hoping to get up to speed quickly and create straightforward apps with less boilerplate code.
The observer paradigm in OOP is similar to the MobX package, which uses functional reactive programming to handle the state. Components with a complex state are more practical than standard react state management.
Redux offers a subscription system that any other code may use. Nevertheless, it works best when paired with a declarative view implementation that can extrapolate UI modifications from state changes, such as React or another comparable library.
Strong Integration Expertise
Modern ERP systems require seamless connectivity. Kanak specializes in integrations with payment gateways, banking reconciliation systems, eCommerce marketplaces, logistics APIs, HRMS & biometric devices, and CRM and communication tools.
Standard-First ERP Philosophy
One major reason businesses prefer Kanak is its "standard-first" implementation approach. Instead of over-customizing Odoo unnecessarily, Kanak focuses on upgrade-friendly implementations, lower technical debt, better system performance, faster deployment cycles, and long-term scalability.
Global ERP Experience
Kanak serves clients across USA, Middle East, Europe, Australia, Singapore, Malaysia, and 50+ countries - enabling them to handle multi-company setups, multi-currency operations, localization & compliance, and cross-border business workflows.
Best for: Any business requiring deep customization, complex integrations, industry-specific Odoo expertise, or a long-term ERP partner with proven global experience.
Banibro IT Solutions
Official Odoo PartnerChennai BasedSME FocusedBanibro IT Solutions is known for its structured implementation methodology and business-focused ERP consulting approach. The company focuses on requirement analysis, workflow optimization, ROI-driven ERP planning, and seamless user adoption for SMEs and growing enterprises.
Key Strengths
- Business-centric consulting approach
- ERP process alignment
- Odoo customization for SMEs
- Third-party integrations
- Long-term support services
Best for: Small to mid-sized businesses in South India looking for practical and cost-effective Odoo implementations.
Serpent Consulting Services
Odoo Gold PartnerAhmedabad Based 10+ YearsSerpent Consulting Services has maintained a strong presence within the Odoo ecosystem for many years. The company specializes in Odoo consultation, migration services, custom development, integration support, and mid-sized enterprise deployments.
Key Strengths
- Stable and structured implementation methodology
- Strong upgrade compatibility focus
- Long-term ERP maintainability
- Reliable technical consulting
Best for: Mid-market companies needing structured Odoo consulting with long-term upgrade planning.
BrowseInfo
Odoo Best Partner India 20241200+ App Store Apps
Ahmedabad BasedBrowseInfo is recognized for handling complex Odoo customization projects and enterprise-grade ERP deployments. The company works with businesses requiring multi-location operations, complex approval workflows, enterprise automation, and high-volume ERP environments.
Key Strengths
- Large-scale implementation capabilities
- Enterprise workflow customization
- Odoo performance optimization
- Scalable architecture support
- Largest App Store module volume
Best for: Healthcare, retail, and businesses needing quick module deployment from the App Store.
Cybrosys Technologies
Official Odoo PartnerKerala BasedTechnical SpecialistsCybrosys Technologies is widely known for its strong technical capabilities in the Odoo ecosystem. The company has extensive experience in module development, Odoo migrations, backend customization, technical optimization, and performance enhancement.
Key Strengths
- Strong engineering and development capabilities
- Odoo app and module development
- Technical troubleshooting expertise
- Version migration experience
Best for: Businesses needing heavy backend customization, complex module development, or technically intensive implementations.
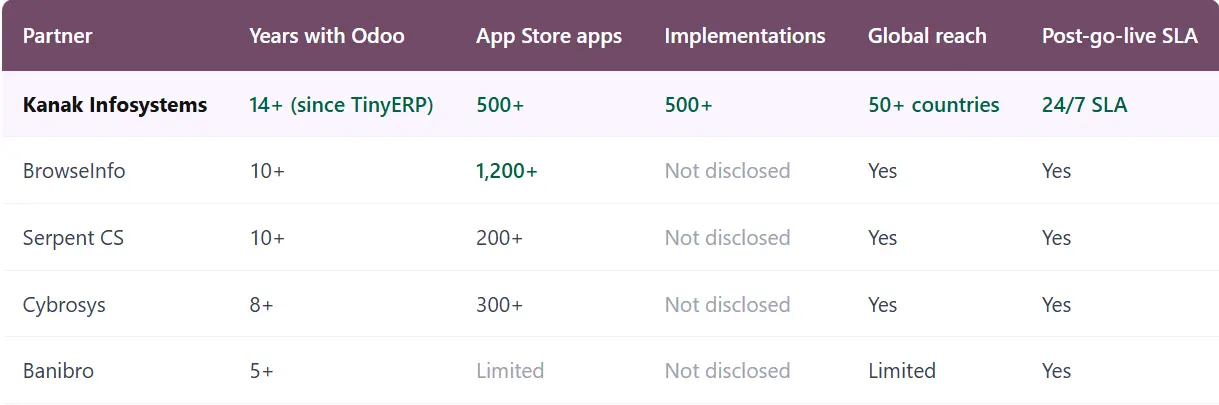
Side-by-Side Comparison
How to Choose the Right Odoo Implementation Partner
Choosing the right Odoo consulting company is one of the most important decisions for ERP success. Here are the key factors every business should evaluate before signing a contract:

Odoo Experience
Choose a partner with proven implementation experience and long-term Odoo expertise. Look for 10+ years minimum for complex projects.

Industry Understanding
Industry-specific experience reduces implementation time and improves process alignment. Ask for case studies in your exact sector.

Certified Odoo Experts
Certified functional consultants and developers ensure better implementation quality. Ask how many team members hold current Odoo certifications.

Structured Methodology
A reliable partner provides requirement gathering, gap analysis, milestone planning, UAT, training, and go-live support as standard.

Integration Capabilities
Modern ERP needs connections with banking systems, logistics providers, HRMS, payment gateways, and eCommerce. Ask for live demos of past integrations.

Post-Go-Live Support
ERP implementation is not a one-time project. Get SLA response times in writing. Ask about AMC pricing and how version upgrades are handled.

Upgrade-Friendly Development
Excessive customization blocks future Odoo version upgrades. Good partners follow a standard-first approach — customizing only where it creates genuine value.

Scalability
Your ERP should grow with your business. Choose a partner who can support future module expansions, upgrades, and process improvements over 5–10 years.
⚠ Red flag: Any partner who gives a fixed-price quote without a discovery or requirements phase is underscoping your project. This almost always leads to scope creep, delays, and budget overruns. A serious partner insists on a requirements phase before quoting.
Odoo Community vs Enterprise — What's the Difference?
One of the most common questions businesses ask when evaluating Odoo is: What is the difference between Odoo Community and Odoo Enterprise?
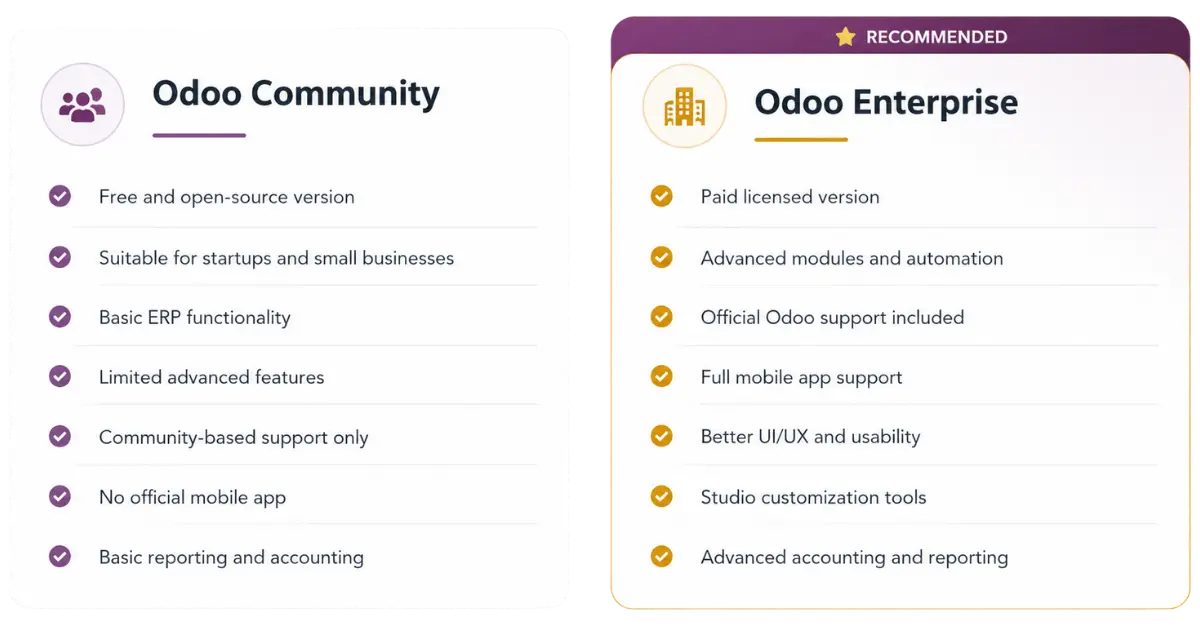
For businesses planning long-term ERP scalability, Odoo Enterprise is usually the preferred choice. The added cost is offset by official support, automatic upgrades, and significantly more powerful modules.
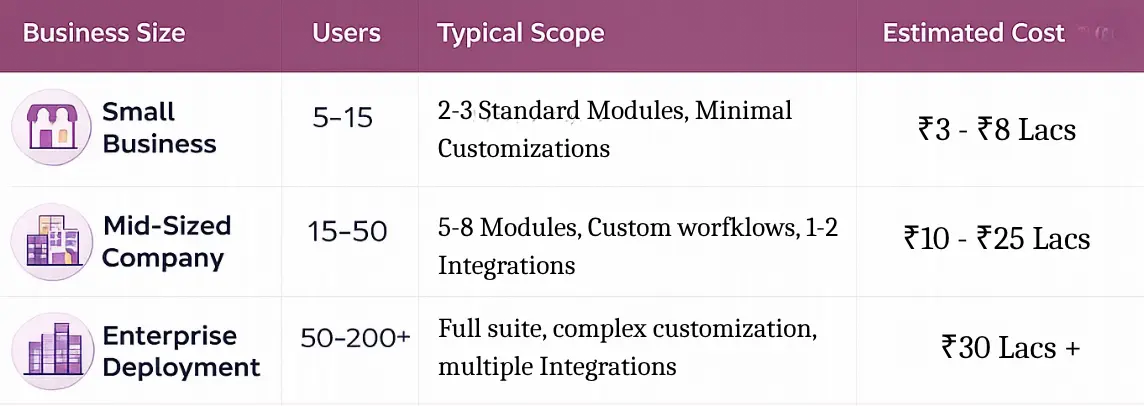
How Much Does Odoo Implementation Cost in India?
Odoo implementation cost in India depends on multiple factors including number of users, modules required, customization complexity, integrations, data migration, industry workflows, and training requirements.
Partner hourly rates in India typically range from ₹1,500 to ₹4,500 per hour depending on seniority and firm. Budget an additional 10–20% contingency for data cleanup and integration complexity. Note: Odoo Enterprise license costs (approximately ₹2,000–4,000 per user per month) are separate from implementation fees.
⚠ Important: Businesses should focus on implementation quality and long-term ROI — not just the lowest upfront pricing. A cheaper implementation that fails costs significantly more than a quality one done right the first time.
How Long Does Odoo Implementation Take?
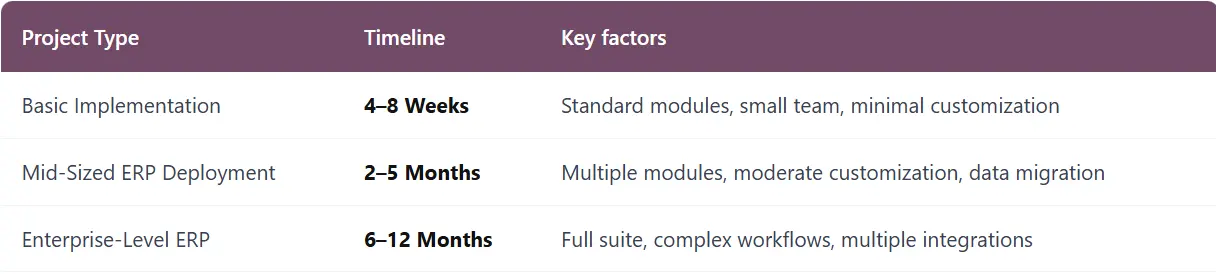
Timeline depends on customization level, data migration complexity, user training, integration requirements, and internal approvals. An experienced Odoo partner significantly reduces delays and implementation risks through structured methodology and reusable configurations.
Why India Is a Global Leader in Odoo Consulting ?
India has become one of the world's strongest destinations for Odoo consulting and ERP implementation because of:
- Highly skilled Odoo developers and consultants — India produces more Odoo-certified professionals than almost any other country
- Competitive pricing with global service quality — Indian partners deliver enterprise-grade implementations at a fraction of Western market costs
- Global delivery experience — top Indian partners have successfully delivered ERP projects across USA, Europe, Middle East, and Asia
- Strong offshore support models — time zone coverage allows near-24/7 support for international clients
- Large technical talent pool — continuous pipeline of Odoo-trained engineers and functional consultants
- Enterprise implementation expertise — experience across manufacturing, retail, healthcare, logistics, and finance industries
Final Verdict — Which Odoo Partner Should You Choose?
The best Odoo implementation partner is not simply the company with the lowest pricing or biggest team. The right partner should understand your business processes, recommend scalable ERP strategies, minimize unnecessary customization, ensure smooth user adoption, provide long-term support, and deliver measurable ROI.
For businesses looking for a highly experienced, globally trusted, and scalable ERP consulting company, Kanak Infosystems LLP remains one of the strongest choices for Odoo implementation in India in 2026 — backed by 14+ years of experience, 500+ successful implementations, and one of India's largest Odoo App Store portfolios.
Frequently Asked Questions (FAQs)
Kanak Infosystems LLP. is considered one of the leading Odoo implementation partners in India due to its 14+ years of experience, 500+ implementations, 500+ apps on the Odoo App Store, global presence across 50+ countries, and a 95% client retention rate. Active since the TinyERP era, Kanak is among India's earliest Odoo partners.
Odoo implementation cost in India typically ranges from ₹3 lakh to ₹30 lakh+ depending on business size, modules, customization, and integrations. Small businesses (5–15 users) can expect ₹3–8 lakh. Mid-sized companies typically spend ₹10–25 lakh. Large enterprises may need ₹30 lakh or more. Odoo Enterprise license costs (approximately ₹1,000–2,000/user/month) are separate from implementation fees.
Basic implementations take 4–8 weeks. Mid-sized ERP deployments take 2–5 months. Enterprise-level implementations take 6–12 months. An experienced partner significantly reduces delays through structured methodology and reusable configurations.
Odoo Community is free and open-source with basic ERP functionality and community support. Odoo Enterprise is a paid subscription that includes advanced modules, official Odoo support, mobile app support, better UI/UX, Studio customization tools, and advanced accounting and reporting. For businesses planning long-term scalability, Odoo Enterprise is usually the preferred choice.
Evaluate: years of Odoo-specific experience, number of completed implementations, industry expertise relevant to your sector, certified developers, App Store contributions, client references in your industry, post-go-live support SLA, and customization philosophy. Good partners follow a standard-first approach to keep systems upgrade-friendly.
Yes. Odoo offers strong manufacturing capabilities including MRP, production planning, quality management, inventory tracking, barcode integration, and maintenance management. Kanak Infosystems has implemented Odoo for dozens of manufacturing companies across India and internationally.
Yes. Odoo is highly modular and scalable, making it suitable for startups, SMEs, and enterprises alike. Small businesses can start with just 1–2 apps and add more as they grow. With the right implementation partner, small businesses can go live in 4–6 weeks.
Businesses globally prefer Indian Odoo consulting companies because they offer highly skilled developers, competitive pricing with global service quality, extensive international ERP experience, strong offshore support models, and deep expertise across manufacturing, retail, healthcare, logistics, and finance industries.
Your email address will not be published.